
 Bodysurfing has likely been around (in one shape or another) for centuries. Every time I see a dolphin gracefully gliding through the face of a wave, I think that people must have always been trying to copy them. Polynesian groms have been using pieces of driftwood to glide into waves for decades. Before leashes were invented, surfers had to bodysurf back to shore anytime they wiped out and lost their boards.
Whether you grew up shredding the beach break with a plastic tray from McDonalds or you’re just a Sunday surfer who loves to get in the water even when you don’t have your board, one thing’s for sure: a properly shaped handplane will take your bodysurfing to the next level.
The idea behind a handplane is simple. You can use the handplane while you’re sliding down the face of the wave to lift your body out of the water. This will mean that there is less drag so you will go a lot faster. More speed means longer rides, deeper barrels, and more fun!
Now do you want one?!? Me too! The only problem is that many surf shops are selling these things for over $100! Long story short, I decided to try and make my own. After all, I am a graduate of the Home Depot children’s birdhouse building university. So I know what I’m doing.
Here’s the list of equipment I used:
- 1″ x 8″ x 3′ Red Oak board from The Home Depot (although you really only need it to be a foot long or so)
- 40 grit sanding disc
- 150 grit sandpaper
- 16″ climbing webbing
- Black & Decker RO100 5-Inch Palm Grip Random Orbit Sander
- Black & Decker JS660 Jig Saw with Smart Select Dial
- Black & Decker LDX120C 20-Volt MAX Lithium-Ion Cordless Drill/Driver
- Minwax 67100 Teak Oil, 1 Quart
Since I already owned each of the power tools listed above, I spent less than $20 for all the materials to make my hand plane. Plus, I’ve got enough wood and teak oil left over to make a couple more. I’d say that Home Depot children’s birdhouse building university (or HDCBBU as alumni call it) is definitely worth the investment. Especially because it’s free!
Anyway, once you’ve got the correct equipment, the actual process of shaping the handplane isn’t very difficult at all (even if you have little to no woodworking experience like me). Are you ready to make your own bodysurfing handplane? Good. Keep reading.
Step 1 – Draw your outline
 The easiest way to make sure your outline is symmetrical is to fold a piece of paper in half and then draw half of your shape. Some of the handplanes I found online had swallow tails and intricate channels carved into the bottom. However, others were relatively flat and simple. I decided to lean towards the simple side, especially because this is my first attempt. Don’t want to get overzealous here.
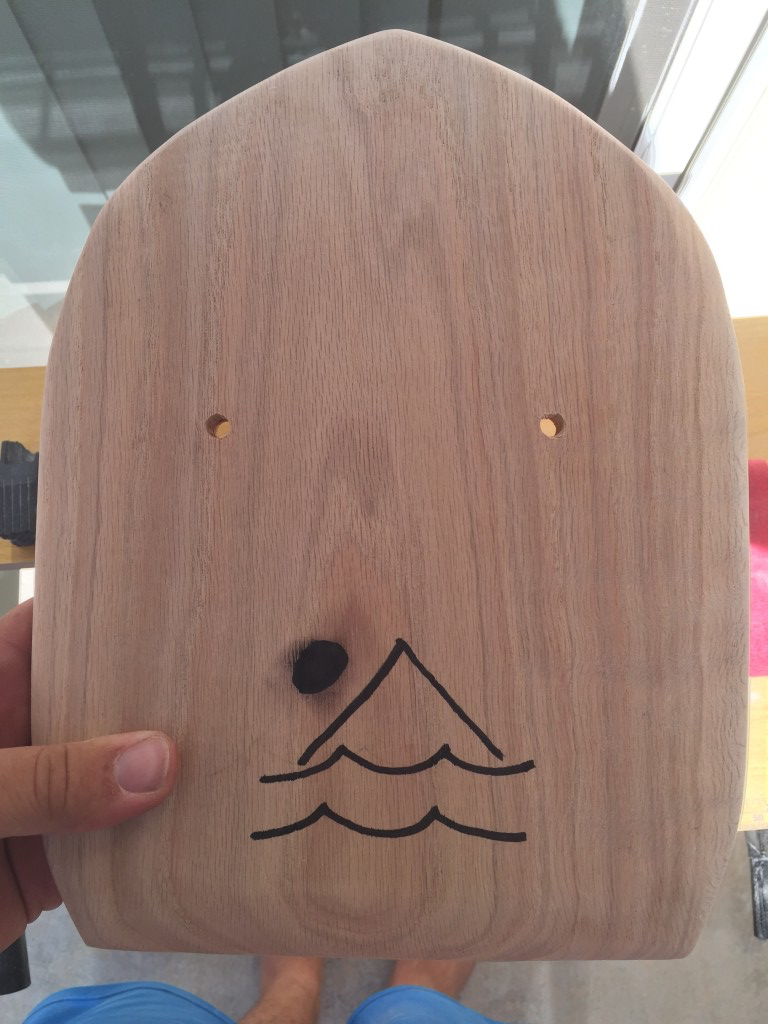
Anyway, above is the outline I drew. Like I said, nothing fancy. However I did want the handplane to be relatively wide. It’s important to keep in mind that the more volume the handplane has, the more lift it will have to keep you out of the water.
I know, we’ve got granite countertops. We’re pretty cool.
Step 2 – Transfer the outline to your piece of wood
This step is pretty self-explanatory. I figured that all of you have traced a shape at least once or twice in your lifetime, so I didn’t bother taking a picture (even though I am a really good tracer).
Step 3 – Cut out the rough shape of your handplane
Using your jigsaw, cut the rough shape of your handplane out of your board. A couple of tips here:

- Make sure to err on the outside of your lines. You can always sand a little more wood off, but you can’t add wood back.
- Try to go slowly and make as smooth of curves as possible. You don’t want the rails of your handplane to have little nicks everywhere.
Step 4 – Turn the top rails down

With the top part of your handplane face up, mark where your biggest knuckles will be. For me, this was about 2/3 of the way up my handplane right where the curve flattened out. Everywhere behind this mark, you want to turn the rails down. This means you’re going to sand a lot of material off the top edge of the board while leaving the bottom edge relatively untouched (note: you still want to round the bottom edge slightly, but the majority of the curve will be off the top edge). Similarly, you want to turn the back edge down and round off the corners.
Step 5 – Turn the nose up
No, your handplane doesn’t have to become French (haha just kidding, I’m sure they’re nice people). But basically, you’re going to flip the board over and do the same thing to the bottom side of the nose that you just did to the top side of the tail. You should start turning up the nose right where you stopped turning down the top rail. Turning the nose of your board up helps the board plane through the water and not start to sink.

Note: It’s important to remember that you still want to round all the edges slightly because you don’t want any hard corner on your handplane (except for possibly the point at the nose).
Step 6 – Sand a channel into the bottom
Now that your rails are finished, it’s time to sand a channel into the bottom of your board. With your board face down, sand a shallow 4-inch channel starting from the middle of your board and finishing at the tail. This will help your board to be more directional on the wave because the water will want to rush through this channel as opposed to the higher edges of the board. It is up to you how deep you want to make this channel, but for a reference point, mine is only about 1/4″ deep at it’s lowest point.
Step 7 – Drill holes for the hand strap
Drill two 1/2″ holes into your board about 2/3 of the way up. Then flip the board over and drill a 3/4″ hole halfway through your board from the bottom. This will allow the knot in the webbing to sit more flush with the bottom of the board, but not to slip all the way through.
Top View

Bottom View
The left picture is a view of the top (you’ll note I also added a design at this stage) and the right is a view of the bottom. You can see the slightly larger holes in the right photo.
Step 8 – Seal the wood

Using teak oil, or boiled linseed oil, or any other sort of waterproofing varnish, apply a liberal coat to your entire handplane. I used some old rags to spread the oil around, however you can also use a paint brush or whatever you like. Let this first coat dry for about a half hour, and then apply a second coat. Make sure you get every section of the wood, especially the insides of the holes you just drilled.
Step 9 – Add your strap
 Now thread your climbing webbing through both holes and tie knots on each end at the proper tightness so that your hand can still slide under snugly. Cut off any excess webbing and use a lighter to melt the ends of the webbing so they don’t fray.
Congratulations! You’ve made yourself a one-of-a-kind bodysurfing handplane. Now go shred some gnarly waves and get pitted for me.
Also, please share the stoke in the comments below. We’d love to see any pictures you have making or enjoying these handplanes.
Jason Scott Gay July 15, 2016
Cheers for article.
My first hand plane has proved to be so much fun. I made it roughy with little direction but loving the fun I can have with it. Am on to hand plane #2 for a mates turning 40, using Paulownia that I sourced cheaply. I have also used webbing with velcro so it’s adjustable for the strap.
Not sure how to post photos to this but would love to show you if possible.
Josh July 17, 2016 — Post Author
Jason, glad to hear you’re having fun with hand planes. It really is amazing how much extra speed and control that little bit of wood will give you.
That’s rad! I have heard that paulownia is great and would love to get my hands on some. Where did you get yours? Also, the adjustable strap is definitely a good call. I’ve added that to my more recent hand planes as well.
I’d love to see pictures of your hand plane. I’ll look into how to allow pictures to be shared on my site.
Cheers,
Josh
Jason July 18, 2016
Earlier in the year I built a wooden surfboard out of Paulownia @ Tree to Sea, Mornington Victoria Australia. Awesome experience. Took an off cut from them and made my first hand plane – rough.
Talking to a bloke in a surf shop a few months back and he mentioned he had a stack of Paulownia in a mates shed that they never got around to doing anything with. Hit him up the other week, drove 2 hours and picked up 2 x 7ft pre-glued ‘blanks’ for a knock down price. So on top of the 40th birthday present, with my two boys (9,7) we have made them their own hand planes. they will be finished tonight with straps and ready to get wet. Yew!
Josh July 18, 2016 — Post Author
That’s super rad! Sounds like a fun father-son project. I can’t wait to get my hands on some paulownia. I’m looking to build a Mini Simmons sometime in the near future.
I’ve never been to Australia, but my wife and I are moving to New Zealand next month and we’re hoping to get over to the Melbourne area at some point while we’re there. Any good suggestions for fun surf spots or must see places?
James V January 11, 2021
Definitely gonna attempt one of these to go along with the new fins i got for Christmas