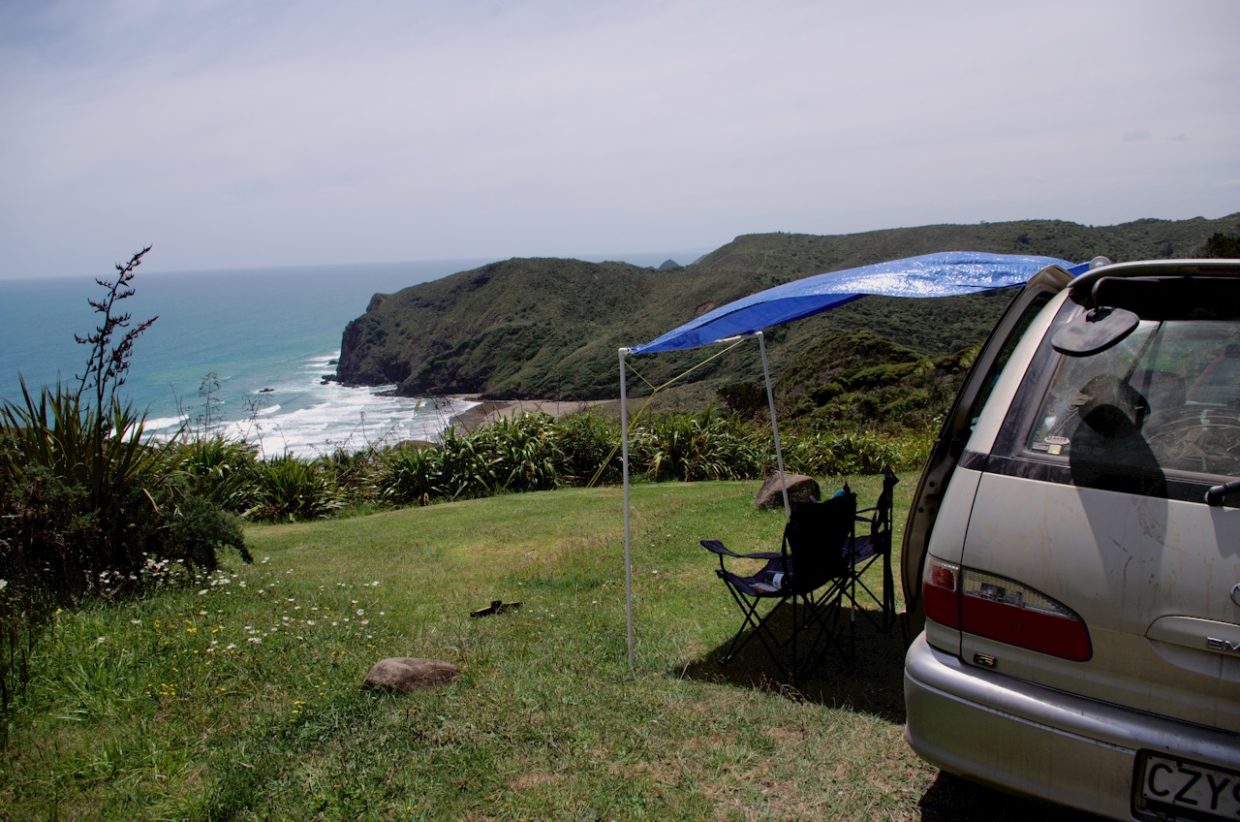
New Zealand is an amazing country! And our little campervan, Gimli, has served us quite well as we travel and explore this beautiful place. However, New Zealand is green for a reason. It rains quite a bit here! After a few nights of being cooped up inside our van, it was clear that we needed an awning.
After doing a brief search on TradeMe, I quickly realised that a legitimate, professional awning was out of the question. The cheapest used awning I could find was over $500! Thus, I decided it was time to try to build a basic DIY campervan awning. Obviously, this is a makeshift awning that cannot stand up to torrential downpours or gale force winds, but it works great for the light drizzles that are so common in New Zealand.
Materials
- 4′ x 6′ Tarp
- 65mm x 1500mm PVC Pipe
- 65mm End Caps (x2)
- 15mm End Caps (x4)
- 15mm x 1500mm PVC Pipe (x3)
- 15mm x 1600mm PVC Pipe (x1)
- 90 degree 15mm PVC Elbows (x3)
- Nylon Cord
- Rivets (5x) and washers (3x)


Basic Requirements
There are a few basic requirements I had for this DIY campervan awning. First, it has to be cheap. Not only are we poor, but if the awning is expensive we might as well have just bought a professionally built awning.
Second, the awning needs to shed light rain and also be UV resistant. The main reason for wanting this awning was to have some shelter from the light drizzle that is so common in NZ.
Third, I wanted the awning to be permanently attached to the roof of our campervan. I wanted the awning to be attached to the roof because we don’t have much space inside our van. Additionally, I wanted to be able to set the awning up quickly if it started raining.
Overall Plan
The overall plan for this awning was to put a small PVC pipe inside of a larger PVC pipe with a slit. The tarp would roll up by wrapping around the smaller PVC pipe.


Step 1 – Prepare the Large PVC Pipe
The first step was to cut the slit in the large PVC Pipe. I’m sure there is a more professional way to do this, but I used a handheld grinder. My cut wasn’t perfect, but it did the job.

Next, I drilled holes in the back of the pipe at the spots where I wanted to attach the awning to the roof racks of our van. This part will depend a lot on your specific type of vehicle, but for a 1998 Toyota Estima I used 6mm and 8mm bolts to screw into the roof rack mounting points.


Step 2 – Drill Holes in 65mm End Caps
I used a step bit to drill 20mm holes in the 65mm End Caps. This allowed the smaller 15mm pipe to fit snugly through and rotate easily.
Step 3 – Attach to Car
At this stage, I attached the large PVC Pipe to the car. I did this because it was much easier to screw the large PVC pipe to the roof rack without the smaller pipe inside. It was a fairly simple process to slide a long socket wrench through the slit in the PVC pipe to screw the bolts onto campervan.
Step 4 – Insert 15mm PVC Pipe and Glue Together
Next I glued the end caps onto the 65mm PVC Pipe. Then I slid the slightly longer (1600mm) 15mm pipe into the 65mm pipe.
Step 5 – Attach End Caps and Elbow to Longer 15mm Pipe
Next, I glued an end cap onto one end of the 15mm pipe that is inside of the 65mm pipe. Then I glued an elbow, a small offcut of pipe, and an end cap onto the other end of the 15mm pipe. This created the crank as shown below.


At first I simply glued the elbow onto the end of the 15mm pipe. However, I realised that the constant twisting of the crank would likely weaken the glue. Thus, I also attached two rivets to hold the elbow firmly in place.
Step 6 – Rivet the Tarp to the Inner 15mm Pipe
This was by far the trickiest step! It was very difficult to align the washers, rivets, and holes because of the narrow slot that I was working with. However, after a lot of wiggling and frustration, I finally got the tarp riveted to the inner 15mm pipe.
Step 7 – Glue Elbows to Outer 15mm Pipe and End Caps to Legs
This step was very simple. Glue elbows to each end of the 15mm pipe that will be the outer horizontal pipe. Next, glue an end cap to one end of each of the pipes that will serve as legs.
Step 8 – Attach the tarp to the Outer 15mm Pipe
In order to attach the tarp to the outer 15mm Pipe, I just used zip ties. There are lots of options that would work here: zip ties, rivets, cord, etc.
Step 9 – Attach Nylon Cord to Outer Horizontal Pipe
The final step to make sure the awning actually stands up is to attach some sort of cord or rope to the outer horizontal pipe. This rope then needs to go to a stake or a weight to hold the awning tight and keep it upright. Without this rope for tension, the awning is bound to fall over.


Final Thoughts
Well, there you have it. This was my first stab at making a DIY Campervan Awning, and there are certainly a few things I would do differently next time.
- First of all, I would make sure the 5′ tarp I was buying was actually 5 feet wide. For some reason, the tarp I bought was slightly wider and longer than the packaging said. This made my PVC measurements slightly too narrow, and thus there is a little slack in the awning.
- I would also buy a tarp that had a few more rivets. The tarp I bought only has 3 rivets on each side. I’d like it to have at least 5 points to attach to the horizontal poles.
- Make the PVC wider than the actual awning. It would be really nice to have more tension across the awning. However, because the tarp was wider than the packaging said, I didn’t cut my PVC wide enough.
If you’ve had success making a DIY campervan awning, please post tips and tricks in the comments below. I am always looking for new projects, and eventually I’m sure I’ll want to improve on this design.
John Thornton January 11, 2017
what was your final price for the awning?
Josh January 11, 2017 — Post Author
I ended up spending just under $50. The PVC pipe was by far the most expensive part, because the tarp was only $6.
Adam Pullman April 26, 2019
Well explained article you have shared with us. Thanks for sharing such a great post with us.
Josh April 30, 2019 — Post Author
Thanks Adam! I’m glad you found it helpful.